여기에서는 Kaldi 툴킷에서 FF 알고리즘에 대해 설명합니다. OpenFst의 것과 다르거나 다른 알고리즘입니다 (많은 알고리즘에 OpenFst 코드 자체를 사용합니다).
이러한 알고리즘은 디렉토리 fstext/에 있으며 해당 명령 행 프로그램은 존재하는 경우 fstbin/에 있습니다. 이 코드는 OpenFst 라이브러리를 사용합니다. 여기서는 현재 Kaldi 레시피에 실제로 사용되는 알고리즘에 대해서만 설명합니다.
Determinization
OpenFst의 알고리즘과 다른 결정 알고리즘을 사용합니다. 우리는 이것을 DeterminizeStar(); 해당 명령 행 프로그램의 이름은 fstdeterminizestar입니다. 우리의 결정 알고리즘은 실제로 결정과 함께 엡실론 제거를 수행한다는 점에서 OpenFst의 알고리즘보다 표준 FST 결정 알고리즘에 더 가깝습니다. 따라서 많은 다른 FST 알고리즘과 마찬가지로 엡실론을 "실제 심볼"로 간주하지 않습니다.
우리의 결정 알고리즘은 초기 결정 출력의 전이에 하나 이상의 출력 심볼이있을 때 발생하는 일을 처리하는 다른 방법을 가지고 있습니다. OpenFst 결정 알고리즘은 하나 이상의 (인코딩 된) 출력 심볼이없는 아크를 보장하기 위해 등가를 유지하면서 출력 심볼 (가중으로 인코딩 된) 주위를 이동하는 FactorWeights라는 함수를 사용합니다. 입력에 엡실론 기호가있는 새로운 상태를 도입하지는 않습니다. 그러나 FactorWeights 알고리즘은 DeterminizeStar의 출력에 대해 실패 할 수 있습니다. 사이클의 상태보다 출력이 더 많은 사이클이있을 수 있기 때문입니다 (엡실론 제거를 수행하지 않기 때문에 일반 결정 알고리즘의 출력에는 불가능 함). 대신, 둘 이상의 출력 심볼이있는 링크가 발생할 때마다 모든 출력 심볼을 수용 할 수있는 충분한 수의 중간 상태로 체인을 만듭니다. 무게와 입력 기호는이 체인의 첫 번째 링크에 있습니다. DeterminizeStar 알고리즘의 출력은 OpenFst가 사용하는 정의, 즉 엡실론을 일반 기호로 취급하는 정의에 따라 결정적입니다. 출력에는 입력 측에 엡실론이 있으며, 이는 결정론의 일반적인 정의에 위배되지만 링크에서 하나 이상의 출력 심볼을 허용하는 인코딩 메커니즘으로 간주되며 어떤 경우에도 매우 구체적으로 발생합니다. 상황 (엡실론 아크는 항상 상태에서 유일한 아크)입니다.
또 다른 차이점은 우리의 프로그램 fstdeterminizestar는 입력 FST에 출력 심볼이 가중치로 인코딩되도록 요구하지 않는다는 것입니다.
Debugging determinization
프로세스 디버깅에 오랜 시간이 걸리면 종료 여부를 말하기가 어렵 기 때문에 일반적으로 디버깅 결정은 매우 어렵습니다. fstdeterminizestar 프로그램에는 "kill -SIGUSR1 \ <its processid \>"신호를 보내면 결정을 디버깅하는 데 유용한 일부 정보가 중지되고 인쇄됩니다.
Determinization in the log semiring
DeterminizeInLog () 함수를 제공하여 결정하기 전에 일반 (열대) 반올림에서 Fst를 로그 반올림으로 캐스팅 한 다음 다시 변환합니다. 이것은 확률론을 보존하기 때문에 알고리즘에서 사용되는 결정의 형태입니다 (확률론 보존 및 테스트 참조).
Removing epsilons
우리는 FST를 절대로 날려 버리지 않을 것이라고 보장되는 RemoveEpsLocal ()이라는 엡실론 제거 알고리즘을 제공하지만 반면에 모든 엡실론을 제거하는 것은 아닙니다. 기본적으로 그래프를 크게 만들지 않고도 쉽게 제거 할 수있는 엡실론을 제거합니다. 어려운 문제이므로 여기에 최적 성이 보장되지 않습니다. RemoveEpsLocal () 함수는 OpenFst의 RemoveEps () 함수와 약간 다른 동작을합니다. 하나는 입력 epsilon과 하나는 출력 epsilon 인 경우 두 개의 호를 결합하기 때문입니다. RemoveEpsLocal () 함수는 FST 동등성을 유지합니다.
로그 세미 링의 확률을 유지하면서 열대성 반올림의 동등성을 유지하는 RemoveEpsLocalSpecial () 함수도 있습니다 (확률성에 대한 자세한 내용은 다음 섹션 참조). 우리는 두 개의 반고리를 동시에 고려해야하기 때문에 반 반복 형식주의의 유용성이 약간 저하되는 경우 인 것으로 보인다.
Preserving stochasticity and testing it
우리는 확률 적 FST를 FST로 정의하는데, 여기서 FST의 반고리에서 주어진 상태 (및 최종 가중치)에서 나온 호의 가중치의 합은 (반고리에서) 1과 같습니다. 이 개념은 로그 세미 링에서 가장 유용하고 자연 스럽습니다. 본질적으로 확률 론적 FST는 주어진 호에서 가중치의 합이 1 인 것입니다 (예를 들어, 적절히 정규화 된 HMM은 확률 론적 FST에 해당합니다).
IsStochasticFst () 함수는 확률을 테스트합니다. 선택적으로 FST가 확률 적으로 실패한 정도를 사용자에게 알리기 위해 최소 및 최대 무게를 출력 할 수 있습니다. 이것의 명령 행 버전은 fstisstochastic입니다. 우리는 확률 론적 입력을 고려하여 확률 론적 출력을 생성한다는 의미에서 확률론을 보존하기 위해 사용하는 대부분의 FST 알고리즘을 목표로합니다. 비 확률 입력의 경우 가중치의 최소 및 최대 범위가 더 커지지 않는 것을 목표로합니다. 기본적으로 isstochasticfst 프로그램은 로그 반올림으로 캐스트 한 후 확률을 테스트합니다. 이것이 가장 유용한 경우입니다 (옵션 –test-in-log = false를 제공하여이를 중지 할 수 있음).
확률 성을 유지하기 위해 우리가 구성하는 FST에는 특정 속성이 있어야합니다. 이는 L, C 및 H에 적용되어야합니다. 예를 들어 L을 고려하십시오. G를 통과하는 경로에 해당하는 모든 선형 FST에 대해이 FST F를 호출하면 제품 L o F는 확률 적이어야합니다. 이것은 기본적으로 L이 발음 확률을 올바르게 표준화했음을 의미합니다. 공식적으로 요구되는 실제 재산은 이것보다 약간 강할 수 있습니다 (이것은 확률이 "적시"에 나타나도록하는 것과 관련이 있습니다). 실제로 그래프 작성의 각 단계마다 isstochasticfst 프로그램을 실행하여 확률을 확인합니다.
Minimization
OpenFst에서 제공하는 최소화 알고리즘을 사용하지만 결정적이지 않은 FST에 최소화를 적용 할 수 있도록 OpenFst를 컴파일하기 전에 패치를 적용합니다. 그 이유는 최소화하기 전에 명확성 기호를 제거 할 수 있기 때문에 더 최적입니다 (최소화로 더 많은 상태를 결합 할 수 있음). 패치는 데이터 구조 관련 문제를 해결합니다. 기본적으로 OpenFst의 최소화 알고리즘은 비 결정적 FST에 적용 할 수 있습니다. 입력 심볼의 일부로 가중치 및 출력 심볼을 인코딩 한 후 FST를 최소화하는 fstminimizeencoded라는 명령 줄 프로그램을 제공하므로 FST가 수락자가됩니다. 이것은 fstminimize 프로그램이 수행하는 것과 동일합니다. 우리가 확률론을 보장하는 방식은 무게 추를 피하기 때문에 바람직합니다.
Composition
대부분의 경우 OpenFst 자체의 컴포지션 알고리즘을 사용하지만 TableCompose () 함수와 해당 명령 줄 프로그램 fsttablecompose를 사용합니다. 이는 특정 경우에보다 효율적인 컴포지션 알고리즘입니다. OpenFst의 "Matcher"개념을 사용합니다. Matcher는 특정 입력 또는 출력 기호가있는 호를 찾기 위해 상태에서 호를 조회하는 컴포지션 중에 사용되는 일종의 도우미 클래스입니다. OpenFst가 사용하는 일반적인 매처는 SortedMatcher입니다.이 레이블은 관련 레이블에서 정렬되는 호에 의존하며 이진 검색을 수행합니다. TableMatcher는 레이블로 인덱스 된 테이블을 작성하는 것이 효율적인 경우를 감지하고이 상태에서는 2 진 검색의 오버 헤드를 피합니다. 이것은 매우 높은 정도의 어휘집으로 구성 할 때 속도가 빨라집니다.
Adding and removing disambiguation symbols
FST 레시피 (다른 트랜스 듀서 기반 레시피와 마찬가지로)는 명확성 기호를 사용합니다. 일반적인 레시피에서는 어휘집 FST (L)의 입력 측에 추가되어 결정 가능합니다. 또한 명확성 기호를 G 및 C에 추가합니다 (음성 기호 참조). 컴포지션을 수행하고 오른쪽의 FST에 입력에 명확성 기호가있을 때마다 이론적으로 왼쪽 FST의 각 상태에 각 명확성 기호에 대한 자체 루프를 추가합니다. 입력 및 출력. 왼쪽과 오른쪽의 명확성 기호에 대한 실제 정수 기호 ID는 동일하지 않을 수 있습니다. 예를 들어 G에는 특수 기호 # 0이 있습니다 (epsilon은 일반적으로 사용됨). 이것에 대한 symbol-id는 일반적으로 가장 높은 번호의 단어에 1을 더한 것입니다. 그러나이 기호를 L을 통해 전달하려면 L의 입력 기호 테이블 (주로 전화를 포함)에 # 0을 나타내는 기호가 필요합니다. 우리는 가변 FST와 레이블의 두 벡터를 취하는 AddSelfLoops () 함수를 가지고 있습니다 (라벨은 심볼의 정수 ID입니다). 벡터는 크기가 동일하며 명확성 기호에 대한 해당 입력 및 출력 레이블을 나타냅니다. 이 기능은 각각의 최종 상태와 그 밖의 하나 이상의 아크에 엡실론이 아닌 출력 기호가있는 각 상태에 자체 루프를 추가합니다.
명령 행에서 fstrmsymbols 프로그램으로 액세스 할 수있는 DeleteISymbols () 함수를 사용하여 명확성 기호를 제거합니다.
'Speech Signal Processing > Speech Recognition' 카테고리의 다른 글
| Subword modelling for ASR (0) | 2022.05.07 |
|---|---|
| [Kaldi Decoding] 칼디 디코딩 그래프 구성 (0) | 2020.06.18 |
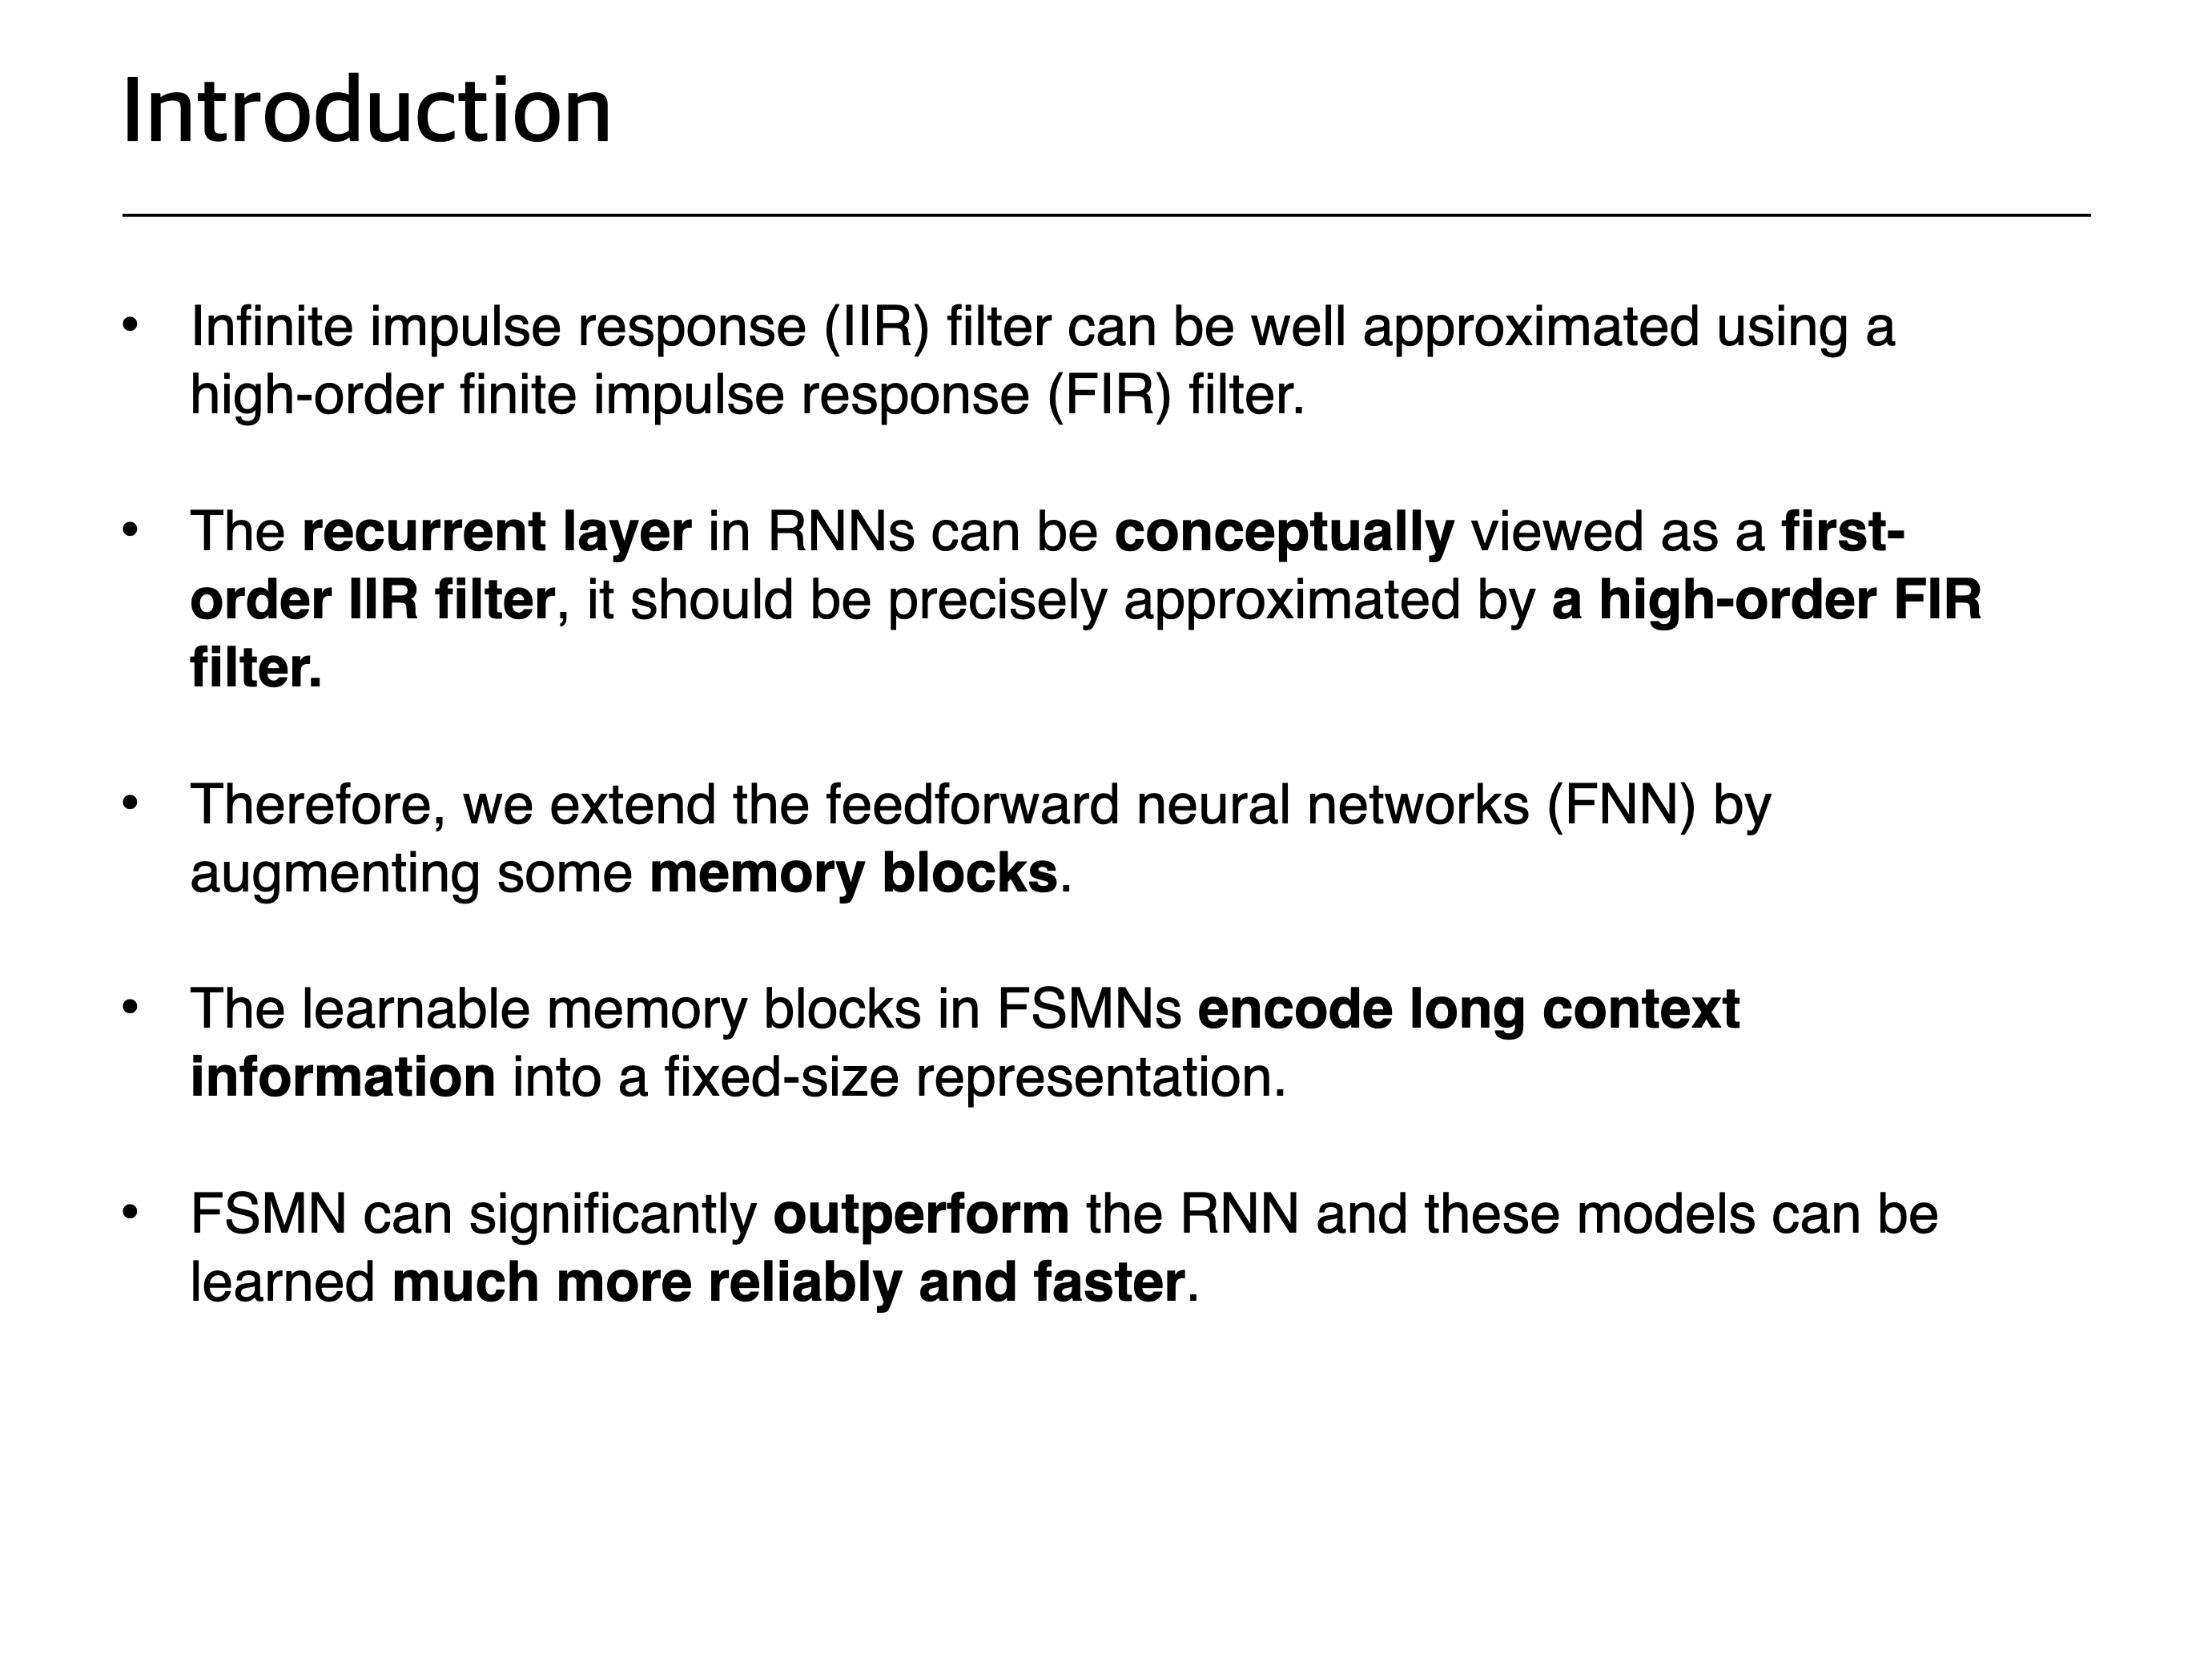
| [Acoustic Model] Feedforward Sequential Memory Networks (FSMN) (0) | 2020.06.15 |
| [speech recognition] Audio augmentation (0) | 2020.06.13 |
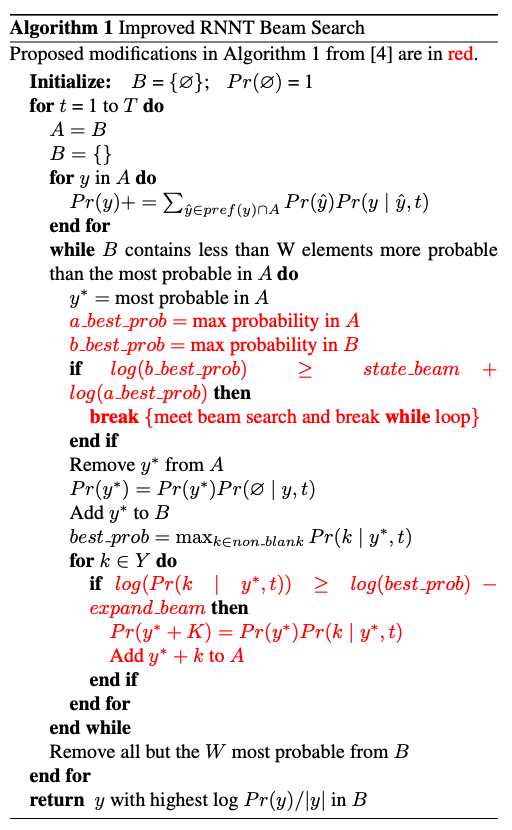
| [E2E ASR] RNN-Transducer for ASR (0) | 2020.06.13 |